先週のParcelのRSCサポートはRSCの仕組みが良くわかるの続きです。
先週は説明出来なかった部分と、サーバーサイドのルーティングに付いて書きます。
 Microsoft Copilotが生成した画像を使っています
サーバーサイドのルーティング
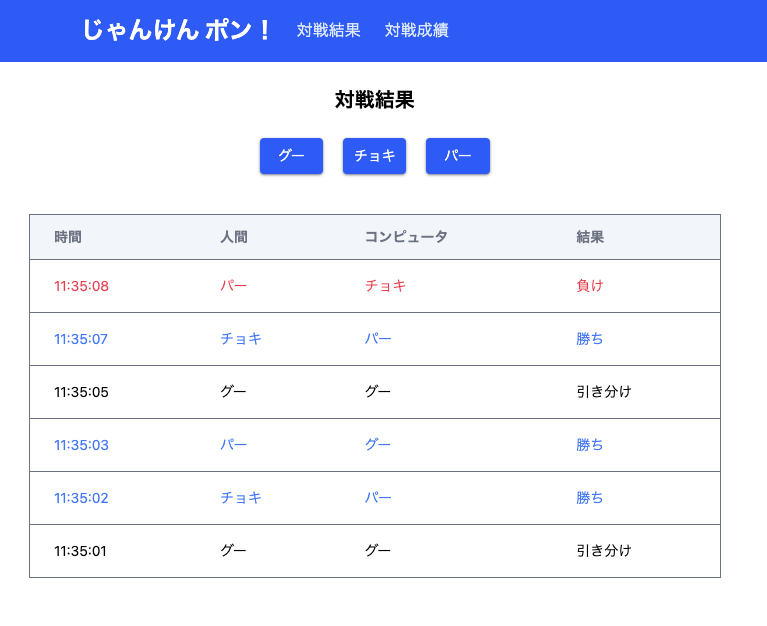
先週のジャンケンアプリでは対戦結果表示のみでしたが、今回はルーティング機能を使いいつものように対戦成績も表示できるようにしました。 Parcel公式ページにもRoutingの説明があります。

server.ts
サーバーはExpressなのでExpress風にサーバーサイドのルーティングが出来ます。
先週
app.get('/', async (req, res) => {
  await renderRequest(req, res, <Page />, {component: Page});
});
↓
今週
GET /では/scoresへリダイレクトGET /scoresでは<Scores>コンポーネントの表示GET /statusでは<Status>コンポーネントの表示
app.get('/', async (req, res) => {
  res.redirect('/scores');
});
app.get('/scores', async (req, res) => {
  await renderRequest(req, res, <Scores />, {component: Scores});
});
app.get('/status', async (req, res) => {
  await renderRequest(req, res, <Status />, {component: Status});
});
Scores.tsx
おなじみのコードです。
"use server-entry";
import './page.css';
import './client';
import JyankenBox from './JyankenBox';
import ScoreList from './ScoreList';
import { getScores } from './actions';
import ApplicationBar from './ApplicationBar';

export async function Scores() {
  const scores = await getScores();
  return (
    <html lang="en">
      <head>
        <meta charSet="utf-8"/>
        <meta name="viewport" content="width=device-width, initial-scale=1.0" />
        <title>Jyanken React Server App</title>
      </head>
      <body>
        <ApplicationBar />
        <div className="mx-2 md:mx-8 md:w-1/2">
          <h1 className="my-6 text-center text-xl font-bold">
            対戦結果
          </h1>
          <JyankenBox />
          <ScoreList scores={scores} />
        </div>
      </body>
    </html>
  );
}
Scores.tsx
Layout部分の共有化をしたいですね、Layout用コンポーネントを作ればよさそうですね。
"use server-entry";

import './page.css';
import './client';
import JyankenBox from './JyankenBox';
import { getScores } from './actions';
import ApplicationBar from './ApplicationBar';
import { calcStatus } from './jyanken';
import StatusBox from './StatusBox';

export async function Status() {
  const scores = await getScores();
  return (
    <html lang="en">
      <head>
        <meta charSet="utf-8"/>
        <meta name="viewport" content="width=device-width, initial-scale=1.0" />
        <title>Jyanken React Server App</title>
      </head>
      <body>
        <ApplicationBar />
        <div className="mx-2 md:mx-8 md:w-1/2">
          <h1 className="my-6 text-center text-xl font-bold">
            対戦成績
          </h1>
          <JyankenBox />
          <StatusBox status={calcStatus(scores)} />
        </div>
      </body>
    </html>
  );
}
ApplicationBar.tsx
アプリケーションバー内のメニューは単純に<a>タグで良いです、ドキュメントにも書かれています。
"use client";

export default function ApplicationBar() {
  const linkCSS = "py-2 px-3 text-blue-100 rounded hover:bg-blue-700";
  return (
    <nav className="bg-blue-600 border-gray-50">
      <div className="max-w-screen-xl flex flex-wrap items-center mx-auto p-3">
        <h1 className="ml-5 text-2xl font-bold text-white">じゃんけん ポン!</h1>
          <ul className="font-medium flex p-2 bg-blue-600">
            <li>
              <a href="/scores" className={linkCSS}>対戦結果</a>
            </li>
            <li>
              <a href="/status" className={linkCSS}>対戦成績</a>
            </li>
          </ul>
      </div>
    </nav>
  );
}
Server Function
デフォルとのclinet.tsxを使うとServer Function呼出しパスもコンポーネントのパスに対応して変わるので以下のようにしました。
先週
app.post('/', async (req, res) => {
  const id = req.get('rsc-action-id');
  const {result} = await callAction(req, id);
  let root: any = <Page />;
  if (id) {
    root = {result, root};
  }
  await renderRequest(req, res, root, {component: Page});
});
↓
今週
再表示するコンポーネントが変わるので、これはこれで良いかもしれませんね。
app.post('/scores', async (req, res) => {
  const id = req.get('rsc-action-id');
  const {result} = await callAction(req, id);
  let root: any = <Scores />;
  if (id) {
    root = {result, root};
  }
  await renderRequest(req, res, root, {component: Scores});
});

app.post('/status', async (req, res) => {
  const id = req.get('rsc-action-id');
  const {result} = await callAction(req, id);
  let root: any = <Status />;
  if (id) {
    root = {result, root};
  }
  await renderRequest(req, res, root, {component: Status});
});
client.ts
先週説明できなかった、client.jsの後半を解説します。
- ① navigate関数はpathnameで指定されたサーバーコンポーネントのレンダリング結果を表示します
- さらにpush引数がtrueならブラウザーの履歴にURLを保存(追加)します
- ② ここで全clickイベントを捕まえ、通常のaタグであればnavigate関数を呼出しサーバーコンポーネントのレンダリングを行い、履歴を保存します
- ③ ブラウザーの進む、戻るボタンが押された際のイベントでサーバーコンポーネントのレンダリングを行います
まとめると、ブラウザーの履歴管理に合わせてサーバーコンポーネントのレンダリングを促す機能です。
"use client-entry";

import type {ReactNode} from 'react';
import {hydrate, fetchRSC} from '@parcel/rsc/client';

・・・ 前半は省略 ・・・

// A very simple router. When we navigate, we'll fetch a new RSC payload from the server,
// and in a React transition, stream in the new page. Once complete, we'll pushState to
// update the URL in the browser.
async function navigate(pathname: string, push = false) {     // ← ①
  let root = await fetchRSC<ReactNode>(pathname);
  updateRoot(root, () => {
    if (push) {
      history.pushState(null, '', pathname);
    }
  });
}

// Intercept link clicks to perform RSC navigation.
document.addEventListener('click', e => {                    // ← ②
  let link = (e.target as Element).closest('a');
  if (
    link &&
    link instanceof HTMLAnchorElement &&
    link.href &&
    (!link.target || link.target === '_self') &&
    link.origin === location.origin &&
    !link.hasAttribute('download') &&
    e.button === 0 && // left clicks only
    !e.metaKey && // open in new tab (mac)
    !e.ctrlKey && // open in new tab (windows)
    !e.altKey && // download
    !e.shiftKey &&
    !e.defaultPrevented
  ) {
    e.preventDefault();
    navigate(link.pathname, true);
  }
});

// When the user clicks the back button, navigate with RSC.
window.addEventListener('popstate', e => {                   // ← ③
  navigate(location.pathname);
});
まとめ
サーバーサイドのルーティングは、通常のExpressのコードなので判りやすいですよね。またブラウザーの履歴との同期もcline.ts内で行われているのでクライアントサイドでは特別なAPIを使わなくても良くなっています。
先週は動かすのに手間取りましたが、慣れて来ると仕組みが透けて見えて使いやすいような気がします。Next.jsを使ってないReactアプリを徐々にReact Server Componentsへ移行するのには便利かも知れませんね。


