最近JavaScript系メルマガBytesでReact等のフロントエンド開発ツールのParcel v2.14.0でReact Server Components(RSC)をサポートしたというニュースを見て驚きました。
皆さんはParcelを覚えていますか? 現在はフロントエンド開発者が直接使う事はあまりないかもしれませんが、大昔からReact等を使っている人はwebpackを使った事があると思います。Parcelはwebpackと同じバンドラー(bundler)と呼ばれるJavaScriptやCSS等のファイルを読み込み、必要なら他ツールを実行し結果を連結しアプリを組み立てるビルド・ツールです。
Parcelはビルド・ツールなので、Next.jsの様なフレームワークとは違いReact Server Componentを実行するためのサーバー機能はありませんし、Server Functionを実行するためのhttp通信もできません。
どうやってReact Server Componentsを実行するのか興味があります❗
 Microsoft Copilotが生成した画像を使っています
ParcelのRSC(React Server Components)
Parcelのホームページには既にReact Server Componentsのドキュメントがあります。またGitHubにはrsc-examplesがあります。
ParcelのReact Server Componentsドキュメントを読むとどうやってRSCを実現しているのかが理解できます。
ParcelのRSCはCreate a serverにあるようにExpressサーバーを使いParcelの提供するランタイム・ライブラリーのAPIrenderRSCで実行しています。
Server FunctionもServer functionsにあるようにExpressで実行するためのAPIのrenderRSCとクライアント側で呼出しを行うAPIをfetchRSC等がランタイム・ライブラリーとして提供されています。
さて、いつものジャンケンアプリを動かしてみましょう
このブログに良く出てくるジャンケンアプリをParcelのRSCを使って作ってみました。
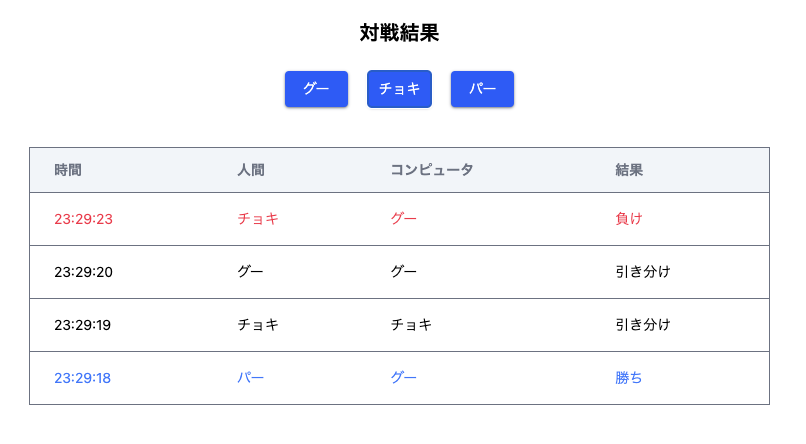
- ジャンケンのボタンが並ぶコンポーネント以外はサーバーコンポーネントです
- ジャンケンの結果はPrisma + SQLite3に格納
- ジャンケンの実行はServer Functionで実行
- スタイリングはTailwind CSS
作成手順
1. アプリ作成
以下のようにcreate-parcelコマンドでParcelを使ったアプリの雛形が作成できます、テンプレートでreact-serverを指定するとRSCを使ったアプリになります。
$ npx create-parcel@latest react-server parcel_rsc_jyanken
$ cd parcel_rsc_jyanken
最初の行は、npm create parcel@latest react-server parcel_rsc_jyankenでも同じです。
2. Tailwind CSSインストール
Tailwind CSSのインストールはTailwind CSSホームページのInstall Tailwind CSS with Parcelに書かれています
“react@canaryを使っているので—legacy-peer-deps`オプションが必要です
$ npm install --legacy-peer-deps --save-dev tailwindcss @tailwindcss/postcss
$ touch .postcssrc        # 内容は下記
$ code src/page.css       # 内容は下記
ファイルの内容
.postcssrc
{
  "plugins": {
    "@tailwindcss/postcss": {}
  }
}
src/page.css
@import "tailwindcss";
3. Prismaインストール
“react@canaryを使っているので—legacy-peer-deps`オプションが必要です
$ npm install --legacy-peer-deps @prisma/client
$ npm install --legacy-peer-deps --save-dev prisma
$ npx prisma init
$ code prisma/schema.prisma                  # 内容は下記
npx prisma migrate dev -n create_scores
- prisma/schema.prisma
generator client {
  provider = "prisma-client-js"
  output   = "../src/generated/client"
}

datasource db {
  provider = "sqlite"
  url      = "file:./jyanken.db"
}

model Scores {
  id        Int      @id @default(autoincrement())
  human     Int
  computer  Int
  judgment  Int
  matchDate DateTime
}
なぜかPrismaクライアントソフトが見つけられないエラーになるので、output = "../src/generated/client"を指定し、Prismaクライアントソフトをsrc/ディレクトリーに置いています。
ディレクトリー・ファイル構造
├── dist/                  ■ 開発時にも、ここにサーバー実行環境が作成されます
├── node_modules/
├── package-lock.json
├── package.json
├── .postcssrc             CSSプリプロセッサPostCSSの設定ファイル
├── prisma/                ■ データベース
├── src
│   ├── JyankenBox.tsx     □ ジャンケンのボタンが並ぶコンポーネント
│   ├── Page.tsx           ■ メインのReactコンポーネント
│   ├── ScoreList.tsx      ■ ジャンケン結果の表示コンポーネント
│   ├── actions.ts         ■ Server Functionのモジュール
│   ├── client.tsx         □ クライアント側、実行ライブラリー
│   ├── generated/         ■ Prisma実行ライブラリー
│   ├── jyanken.ts         ■□ ジャンケンの型や関数のモジュール
│   ├── page.css           ■□ CSS
│   └── server.tsx         ■ サーバー側、実行ライブラリー
└── tsconfig.json

■ = サーバー側で実行、□ = クライアント側で実行
各ファイル
Page.tsx
メインのReactコンポーネント
- サーバーで動くコンポーネントです
"use server-entry"という独自指定がされています、サーバー側のエントリーコンポーネントですgetScores()関数でデータベースからジャンケンの結果を取得します- クライアント側のReactコンポーネントと違い、全HTMLが書かれていますね
"use server-entry";

import './page.css';
import './client';
import JyankenBox from './JyankenBox';
import ScoreList from './ScoreList';
import { getScores } from './actions';

export async function Page() {
  const scores = await getScores();
  return (
    <html lang="en">
      <head>
        <meta charSet="utf-8"/>
        <meta name="viewport" content="width=device-width, initial-scale=1.0" />
        <title>Jyanken React Server App</title>
      </head>
      <body>
        <div className="mx-2 md:mx-8 md:w-1/2">
          <h1 className="my-6 text-center text-xl font-bold">
            対戦結果
          </h1>
          <JyankenBox />
          <ScoreList scores={scores} />
        </div>
      </body>
    </html>
  );
}
JyankenBox.tsx
ジャンケンボタンの並んだコンポーネント、このコンポーネントはクライアントで動きます。
- jyankenPon関数はサーバーにあるServer Functionです
"use client";
import { Te } from "./jyanken";
import { jyankenPon } from "./actions";

export default function JyankenBox () {

  const buttonClass = `text-white text-center text-sm rounded w-16 px-2 py-2
    bg-blue-600 hover:bg-blue-700 shadow shadow-gray-800/50`;

  return (
    <div className="w-[230px] mx-auto flex mb-10">
      <button type="button" onClick={() => jyankenPon(Te.Guu)} className={buttonClass}>
        グー
      </button>
      <button type="button" onClick={() => jyankenPon(Te.Choki)} className={`${buttonClass} mx-5`}>
        チョキ
      </button>
      <button type="button" onClick={() => jyankenPon(Te.Paa)} className={buttonClass}>
        パー
      </button>
    </div>
  );
}
actions.ts
Server Functionのモジュール
- getScores関数は、データベースからジャンケンの結果を最大10件取得します
- jyankenPon関数は、人間の手を引数で受け取り乱数のコンピューターとジャンケンを行い、結果をデータベースに格納します
'use server';

import { PrismaClient } from "./generated/client";
import { judge, randomHand, Score, Te } from "./jyanken";

const prisma = new PrismaClient();

export const getScores = async () => {
  const scores = await prisma.scores.findMany({orderBy: {id: 'desc'}, take: 10}) as Score[];
  return scores;
}

export const jyankenPon = async (humanHand: Te) => {
  const computerHand = randomHand();
  const score: Score = {
    human: humanHand,
    computer: computerHand,
    judgment: judge(humanHand, computerHand),
    matchDate: new Date()
  };
  await prisma.scores.create({ data: score });
}
ScoreList.tsx
サーバー側で実行されるコンポーネント。今までのブログ記事と同じです。
import { Score } from './jyanken';

const JudgmentColor = ["text-[#000]", "text-[#2979ff]", "text-[#ff1744]"];

type ScoreBoxProps = {
  scores: Score[];
}
export default function ScoreBox ({scores}: ScoreBoxProps)  {
  const header=["時間", "人間", "コンピュータ", "結果"];
  return (
    <table className="w-full text-sm text-left text-gray-500">
      <thead className="bg-slate-100 border">
        <tr>
          {header.map((title, ix) => (
            <th key={ix} scope="col" className="px-6 py-3">
              {title}
            </th>
          ))}
        </tr>
      </thead>
      <tbody className="bg-white border">
        {scores.map((score, ix) => (
          <ScoreListItem key={ix} score={score} />
        ))}
      </tbody>
    </table>
  );
}

type ScoreListItemProps = {
  score: Score;
};
function ScoreListItem({score}: ScoreListItemProps) {
  const teString = ["グー", "チョキ", "パー"];
  const judgmentString = ["引き分け", "勝ち", "負け"];
  const dateHHMMSS = (d: Date) => d.toTimeString().substring(0, 8);
  const tdClass = `px-2 md:px-6 py-4 ${JudgmentColor[score.judgment]}`;

  return (
    <tr className="bg-white border-b">
      <td className={tdClass}>{dateHHMMSS(score.matchDate)}</td>
      <td className={tdClass}>{teString[score.human]}</td>
      <td className={tdClass}>{teString[score.computer]}</td>
      <td className={tdClass}>{judgmentString[score.judgment]}</td>
    </tr>
  );
};
jyanken.ts
ジャンケンの型や関数のモジュール。今までのブログ記事と同じです。
export const Te = {
  Guu: 0,
  Choki: 1,
  Paa: 2
} as const;
export const Judgment = {
  Draw: 0,
  Win: 1,
  Lose: 2
} as const;

export type Te = (typeof Te)[keyof typeof Te];
export type Judgment = (typeof Judgment)[keyof typeof Judgment];

export type Score = {
  human: Te;
  computer: Te;
  judgment: Judgment;
  matchDate: Date;
};

export type Status = {
  draw: number,
  win: number,
  lose: number
}

export const randomHand = (): Te => {
  return Math.floor(Math.random() * 3) as Te;
}

export const judge = (humanHand: Te, computerHand: Te): Judgment => {
  return (computerHand - humanHand + 3) % 3 as Judgment;
}

export const calcStatus = (scores: Score[]): Status => {
  const jugdeCount = (judge: Judgment) =>
    scores.reduce((count, score) => score.judgment === judge ? count + 1 : count, 0);
  return {
    draw: jugdeCount(Judgment.Draw),
    win:  jugdeCount(Judgment.Win),
    lose: jugdeCount(Judgment.Lose)
  };
}
server.tsx
サーバー側、実行ライブラリー。今回は、create-parcelが作成したファイルをそのまま使っています。
- Expressサーバーのコードです
GET /でPageコンポーネントをサーバー上のrenderRequest関数でレンダリングし、結果のRSC Wire Format(独自のDOM風JSONデータ)をクライアントに戻しますPOST /はServer Functionの実行リクエストなのでHTTPリクエスト・ヘッダーにあるrsc-action-idに関数名(+クライアントID)があるので、callAction関数はそれを使いServer Functionを探し、POSTされたデータを渡し実行します。そして関数の結果と、renderRequest関数でレンダリングしたPageコンポーネントの結果を戻しています
import express from 'express';
import {renderRequest, callAction} from '@parcel/rsc/node';

// Page components. These must have "use server-entry" so they are treated as code splitting entry points.
import {Page} from './Page';

const app = express();

app.use(express.static('dist'));

app.get('/', async (req, res) => {
  await renderRequest(req, res, <Page />, {component: Page});
});

app.post('/', async (req, res) => {
  const id = req.get('rsc-action-id');
  const {result} = await callAction(req, id);
  let root: any = <Page />;
  if (id) {
    root = {result, root};
  }
  await renderRequest(req, res, root, {component: Page});
});

app.listen(3000);
console.log('Server listening on port 3000');
client.tsx
クライアント側、実行ライブラリー。今回は、create-parcelが作成したファイルをそのまま使っています。
"use client-entry"があるのでブラウザーの表示時に実行されますhydrate関数でクライアント側でのServer Function呼出し関数callServerを定義しています- この
callServerが実行されるとfetchRSCAPIでサーバーにPOSTリクエストを送信し、結果を受け取っています - さらに、updateRootの戻り値の関数を使い、
fetchRSCの戻したコンポーネントをレンダリングします
このコードの後半の省略された部分は、私が理解出来てないので次回以降のブログで説明します。😅
"use client-entry";

import type {ReactNode} from 'react';
import {hydrate, fetchRSC} from '@parcel/rsc/client';

let updateRoot = hydrate({
  // Setup a callback to perform server actions.
  // This sends a POST request to the server, and updates the page with the response.
  async callServer(id, args) {
    console.log('Handling server action', id, args, location.pathname)
    let {result, root} = await fetchRSC<{root: ReactNode, result: any}>(location.pathname, {
      method: 'POST',
      headers: {
        'rsc-action-id': id,
      },
      body: args,
    });
    updateRoot(root);
    return result;
  },
  // Intercept HMR window reloads, and do it with RSC instead.
  onHmrReload() {
    navigate(location.pathname);
  },
})


・・・ 以下省略 ・・・
まとめ
今回のサンプルコード動かすのに苦労しましたが、 NextjsでReact Server ComponentsやServer Functionを使っていると全くのブラックボックスですが、今回のParcelのRSCは色々と見えて楽しいですね。
React Server Componentsは
- Expressサーバーで動く
server.tsxコードがGET /リクエストを受け取り - サーバー上で
Page.tsxコンポーネントがレンダリングされ - RSC Wire Format(独自のDOM風JSONデータ)がブラウザーに送られ、JavaScriptが画面に表示する
サーバーでReactコンポーネントがレンダリングされているのが分かると思います。
Server Functionは
- クライアントで動く
JyankenBox.tsxコンポーネントのjyankenPon関数呼出しから、client.tsxで定義されたcallServer関数呼出への接続は見えませんが callServerが実行され、サーバーに引数と共にPOST /リクエストが送られます- Expressサーバーで動く
server.tsxコードがPOST /リクエストを受け取り - サーバー上で
callActionがactions.tsのjyankenPon関数を呼出す actions.tsのjyankenPon関数が実行されるPage.tsxコンポーネントが再レンダリングされjyankenPonの戻り値と再レンダリング結果がクライアントに送られるclient.tsのcallServer関数がレンダリング結果をブラウザーに描画する
一部、見えてない部分もありますがServer Functionの流れが分かると思います。
たぶん、続く・・・