今更ながらWeb Componentsを学んでみた(1) の続きです。今回Web Components構築ライブラリー Lit を使っていつものジャンケンアプリを作ってみました。
 Bing Image Creatorが生成した画像を使っています
HTML Templatesに付いて
前のブログでWeb ComponentsのHTML Templatesが理解できてないと書きましたが、その後に学びました。
<temprate>タグでHTMLの集まりを括る事で、その集まりをテンプレートととして再利用できるようになる- テンプレートの利用にはJavaScriptのコードを書く必要がある
- テンプレート中の
<slot>タグを、テンプレート利用時のslot属性でカスタマズできる
ReactのJSXや各種Webフレームワークにあるテンプレートとは異なり、条件分岐や繰り返しのような機構はありません。動的にHTMLを作成するにはJavaScriptでのDOM操作が必要になります。
いつものジャンケンアプリをLitで作ってみた
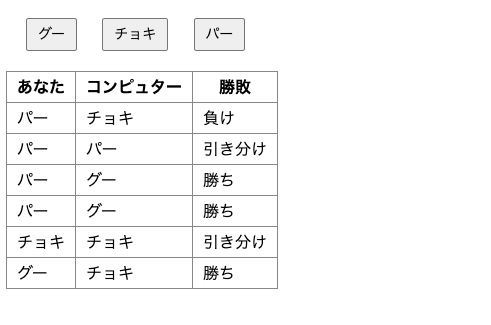
HTML Templatesを使うのは諦め、前のブログ で紹介した Lit を使って下図のいうなジャンケンアプリを作る事にします。

まず、前のブログ で説明したLitの知識だけで、書いたものが以下のコードになります。
- ① Reactのステートに相当するリアクティブ・プロパティ、ジャンケン結果オブジェクト
{human: 人間の手, computer: コンポーネントの手, judgment: 勝敗}の配列です - ② ジャンケンを行った際にはジャンケン結果を
this.scores配列に連結しています - ③ コンポーネント内のCSS定義はcssタグ付きテンプレートで定義し
styles変数に代入します - ④
@click=はジャンケンボタンのクリックのイベントハンドラーです - ⑤
this.scoresの内容表示の繰り返し部分はmap関数を使い作ります。Reactと同じですね❗
<!DOCTYPE html>
<html lang="ja">
  <head>
    <meta charset="UTF-8">
    <meta name="viewport" content="width=device-width, initial-scale=1.0">
    <title>Counter</title>
  </head>
  <body>
    <script type="module">
import { LitElement, html, css } from "https://esm.sh/lit";

class JyankenElement extends LitElement {
  static properties = {
    scores: {type: Array}                                  // ← ①
  };

  constructor() {
    super();
    this.teString = ["グー","チョキ", "パー"];
    this.judgmentString = ["引き分け","勝ち", "負け"];

    this.scores = [];
  }

  pon(human) {
   const computer = Math.floor(Math.random() * 3);
   const judgment = (computer - human + 3) % 3;
   const score = {human, computer, judgment};
   this.scores = [score, ...this.scores];                 // ← ②
  }

  static styles = css`  <!--  ← ③ -->
    table {
      border-collapse: collapse;
    }
    td, th {
      border: solid 1px #888; padding: 3px 10px;
    }
    .jyanken_box {
      margin: 20px 10px;
    }
    button {
      margin: 0 10px; padding: 4px 10px; font-size: 14px;
    }
  `;

  render() {
    return html`
      <div class="jyanken_box">  <!-- ↓ ④ -->
        <button @click=${() => this.pon(0)}>グー</button>
        <button @click=${() => this.pon(1)}>チョキ</button>
        <button @click=${() => this.pon(2)}>パー</button>
      </div>
      <table>
        <thead>
          <tr>
            <th>あなた</th>
            <th>コンピュター</th>
            <th>勝敗</th>
          </tr>
        </thead>
        <tbody>
        ${this.scores.map((scrore) => html`  <!-- ← ⑤ -->
          <tr>
            <td>${this.teString[scrore.human]}</td>
            <td>${this.teString[scrore.computer]}</td>
            <td>${this.judgmentString[scrore.judgment]}</td>
          </tr>`
        )}
        </tbody>
      </table>
    `;
  }
}

customElements.define("jyanken-element", JyankenElement);
    </script>

    <jyanken-element></jyanken-element>
  </body>
</html>
コンポーネントの分割
さて、ここで結果表示、ボタン、メインのコンポーネントに分けてみましょう。Litはここでも便利な機能を提供していますね。
結果表示コンポーネント
結果表示はジャンケン結果の配列を受け取る必要があります、getAttribute()メソッドを使って受け取る事もできますが、文字列しか渡せません。そこでLitではリアクティブ・プロパティに独自のプロパティ(Props)を渡す事ができます。
このcores-elementコンポーネントに引数を渡すにはドットから始まるプロパティを使います → Property expression
<cores-element .scores=${this.scores}></cores-element> のように書きます。
class ScoresElement extends LitElement {
  static properties = {
    scores: {type: Array}
  };

  constructor() {
    super();
    this.teString = ["グー","チョキ", "パー"];
    this.judgmentString = ["引き分け","勝ち", "負け"];
  }

  static styles = css`
    table {
      border-collapse: collapse;
    }
    td, th {
      border: solid 1px #888; padding: 3px 10px;
    }
  `;

  render() {
    return html`
      <table>
        <thead>
          <tr>
            <th>あなた</th>
            <th>コンピュター</th>
            <th>勝敗</th>
          </tr>
        </thead>
        <tbody>
        ${this.scores.map((scrore) => html`
          <tr>
            <td>${this.teString[scrore.human]}</td>
            <td>${this.teString[scrore.computer]}</td>
            <td>${this.judgmentString[scrore.judgment]}</td>
          </tr>`
        )}
        </tbody>
      </table>
    `;
  }
}
customElements.define("scores-element", ScoresElement);
ボタンコンポーネント
このコンポーネントもプロパティでコールバック関数を受け取っています。リアクティブ・プロパティの型はFunctionになります。
class ButtonsElement extends LitElement {
  static properties = {
    pon: {type: Function}
  };

  constructor() {
    super();
  }

  static styles = css`
    div {
      margin: 20px 10px;
    }
    button {
      margin: 0 10px; padding: 4px 10px; font-size: 14px;
    }
  `;

  render() {
    return html`
      <div>
        <button @click=${() => this.pon(0)}>グー</button>
        <button @click=${() => this.pon(1)}>チョキ</button>
        <button @click=${() => this.pon(2)}>パー</button>
      </div>
    `;
  }
}
customElements.define("buttons-element", ButtonsElement);
メインコンポーネント
メインのコンポーネントは<buttons-element>、<scores-element>コンポーネントを呼出す事でスッキリしました。
どちらのプロパティともにドットから始まるLitの拡張機能を使います。
- ① このコンポーネントのリアクティブ・プロパティはステートのみで使っているので
state: trueを指定しています - ② Reactのクラスコンポーネントと同様に関数引数には
.bind(this)が必要になります(面倒ですね)
class JyankenElement extends LitElement {
  static properties = {
    scores: {type: Array, state: true}  // ← ①
  };

  constructor() {
    super();
    this.scores = [];
  }

  pon(human) {
    const computer = Math.floor(Math.random() * 3);
    const judgment = (computer - human + 3) % 3;
    const score = {human, computer, judgment};
    this.scores = [score, ...this.scores];
  }

  render() {
    return html`                     <!-- ↓ ② -->
      <buttons-element .pon=${this.pon.bind(this)}></buttons-element>
      <scores-element .scores=${this.scores}></scores-element>
    `;
  }
}
customElements.define("jyanken-element", JyankenElement);
まとめ
Lit を使うとReactを書くように簡単にWeb Componentsが書けます。
今回はめずらしくTypeScriptではなくJavaScriptで書いていますが、モダンな開発環境も使っていません。ライブラリーもCDNからインポートしています。
SPA(Single Page Application)でフロントエンドを作るならLitではなく、ReactやVueを使うと思います。
しかし、従来jQueryを使って書いていたような便利機能を作るのには、Litは良い選択肢たど思いました。


